Showing posts with label Windows. Show all posts

Tuesday, August 06, 2013

Issue
If you are using IIS Web server for hosting your application, Sometimes these kind of error can be trigger when try to upload a large file using your application.
  • "The request filtering module is configured to deny a request that exceeds the request content length."
  • "System.Web.HttpException: Maximum request length exceeded."
Reason
Default IIS settings only allow to upload up to  4Mb large files. Rest are filtered and shows the one of above error.

Solution
Solution is you need to increase default max allow file size to what ever you want size. This can be do in two levels
  1. Application level
  2. Server level
 Lets see how to do each. first we are going to look at "Application Level" configuration changes.

1. Application Level
Step1:
Go to  "Control Panel" -> "Administrative Tools" ->" Internet Information Services (IIS) Manager"

Step2: 
Expand the connection explorer and double click on the site you working on.

Step 3:
In the right hand panel, you can see the set of icons under few categories, Go to category Management and double click on the "configuration editor icon". 


Step 4:
Then the configuration editor window will appear and you have to click the link "Search Configuration" at right hand side pane.


Step 5: 
Then "Configuration Search" dialog will appear and first you have to select the "web.config" file and then click the link on right bottom of the dialog.


Step 6:
Then "web.config" file will open in your default XML editor and it shows all the configuration that applicable to particular web site. So now we are going to add default upload limit configuration to MySite01, to override default server configuration.Here I need to allow file upload until 1GB (1*1024*124 = 1048576 KB) size. So what i need to do is just copy and paste following piece of code to the "web.config" file just after start the <configuration> tag.

<system.webServer>
    <security>
      <requestFiltering>
        <requestLimits maxAllowedContentLength="2147483648"/>
      </requestFiltering>
    </security>
  </system.webServer>
  <system.web>
    <httpRuntime maxRequestLength="1048576" />
  </system.web>


Step 6: 
Then your file should looks like this. Be careful someone may be previously added the same configuration to this file. At that situation you have to edit the values instead of newly adding.


Step7: 
Now you edit the configuration. But to apply these configurations you have to restart the IIS server. To do so run the command prompt as Administrator (click start button-> type cmd in search box -> once you see the command prompt icon -> right click and select "Run as administrator"). Type iisreset and press enter.


2. Server Level

Setp 1:
Open the command prompt as administrator (click start button-> type cmd in search box -> once you see the command prompt icon -> right click and select "Run as administrator") and go to c:\Windows\System32\inetsrv directory

Step 2:
 Type the following command and press enter

appcmd.exe unlock config -section:system.webServer/security/requestFiltering

Step 3:
If your command is correct and worked properly you can see a result like following window. Actually here disabling the file size validation. But not, increasing the allowed max file size.

Step 4:
Now you edit the configuration. But to apply these configurations you have to restart the IIS server. Type iisreset and press enter.

Tuesday, July 16, 2013

What is C++ Name Mangling

What is Name Mangling
Modern programming languages consist with user friendly and function rich features like overloading, overriding, namespace, class etc.. Also most of the OOP languages allow programmer to do logical grouping of coding than writing the whole code in one global space. So when modern programming languages need to support to features like above mentions, compile makers get trouble and the compiling and validation logic may get more complex. As examples Different classes can be have functions/member variables with same name
Same class can be have same function name with different arguments(function overloading)
Base class and child can have same function name (function overriding)
Different Namespaces can have same name for function, structure, class or another datatype.

So when compiler processing the situation not like old structural language, naming is quite complex. So there should be a way to make above each names unique. Then linker can uniquely identify the correct function and call it. 

So because of the above reason and few of other reason compiler makers introduce a concept call "Name Mangling" what here doing is make a function name by adding some prefix or post-fix to the function name when compiling the program. as example

class Test()
{
int add(int a, int b);
int add(int a, int b, int c);
}
Here is two functions with same name in same class, but number of argument is different. So If I make my own compiler I can purpose a Name Mangling style 

_functionName@numberOfArguments@FirstCharactorOfArgumentsType

This is my own Name Mangling (unique function name generation) style (No real style like this). So the above two function Name Mangling will be 

_add@2@i
_add@3@i

So the linker can differentiate the function now and both functions have unique names. This is looks like decorating the function names. So Name Mangling also called as "Name Decoration".


Other Than Name Decoration
Other than name decoration, Name Mangling use to pass some information from compiler to linker, such as argument type, length of the argument, calling conventions. Because the Mangling name can be consist with  some information other than function name. So this also a extra benefit of Name Mangling. in our abouve example linker can extract the number of argument ( two or three) and argument type (integer) from the unique function name. So even the languages like C that doesn't exist function overloading and overriding kind of advance features, also using Name Mangling for pass these extra information from compiler to linker or platform.  


C++ Name Mangling 
Various C++ compilers also implemented their own Name Mangling styles. So compiler to compiler generated name for same function would be different. Some time version to version of same compiler also may be use different Name Mangling styles. So As you can understand the object code compiled by different compilers could not be link together because of their different Name Mangling. But Some of the compilers vendors fallow the same Name Mangling styles. But we cannot expect 100%  those will be same.
Actually C++ having quite complex features like template, operator overloading. So the Name Mangling styles of C++ compilers are more complex than other languages.


Stranded for C++ Name Mangling
There is not a standers for C++ Name Mangling. If there is a standers for Name Mangling, the object code compiled by different compilers could be link together using one linker. But when we come to linker story, Name of the function is not only the matter for compatibility there are some few things need to consider when linking the functions object codes together such as exception handling, virtual table structure etc... These binary interfaces are called  Application Binary Interfaces. So Name of the function (Name Mangling) is only one ABI. there are few more. So if there is a standers Name Mangling for C++, that would not be enough for link the different compiler binaries together. And also If there is a slandered  for Name Mangling it would be a limitation for the compiler vendors too.  Other than that C++ standers encourage to keep different Name Mangling sachems to prevent linking with incompatible codes just only because of their same names .  


Wednesday, June 12, 2013


When you try to install C# application in windows environment you may gets a error message "Application cannot be started contact the application vendor". Look at the error dialog shows below.

Then if you click on the details button, A text file opens with the details of the error and it shows lot more details  about the issue.


If the "ERROR SUMMARY" may be as below.

Below is a summary of the errors, details of these errors are listed later in the log.
* Activation of C:\application_path\application_name.application resulted in exception. Following failure messages were detected:
+ Deployment and application do not have matching security zones.

And also "ERROR DETAILS" can be shown as below

Following errors were detected during this operation.
* [date and time] System.Deployment.Application.InvalidDeploymentException (Zone)
- Deployment and application do not have matching security zones.
- Source: System.Deployment
- Stack trace:

If you faced above situation and looking for a solution, Here is the correct place you need to stay and read. below few steps may help you to fix the issue if you fortunate enough. There can be few reasons for this issue and here explains how to fix each of those by doing some simple steps. Normally this issue happens when you try to install a application using OneClick method that support by .NET framework.  


  • Before publish your application make sure to go to project properties->"Security tab" and select "This is fully trusted application"
  • And go to project properties->"Publish tab" and select "This application available offline as well".
  • And make sure to at-least sign your application by test certification.

1. Corruption of previous installation file: 
If you install same application previously in the same computer, remaining file or signatures may troubling you
Solution: Uninstall all the previous versions and try to install the application again.

2. Corruption of oneClick cache:
If you try to install this application several time or if it fails one time or because of other application cache this error trigger at the situation.
Solution: Clear the oneClick cache and try to install the application again. Here is the way to clear oneClick cache
From command line run:    rundll32 dfshim CleanOnlineAppCache
If it doesn’t work, delete the real folder:
Windows Vista/7/8
C:\users\[username]\AppData\Local\Apps\2.0\
Windows XP/2003
C:\Documents and Settings\username\LocalSettings\Apps\2.0\


3. Corruption or missing of setup files:
Solution: Download the release files from originally hosted location and try to install it again.

4. If user click on a URL and select “Run” method to install the application:
Solution: Use Internet Explorer, If you are directly install from an URL.  Add setup file hosted domain name to “Trusted sites” in Internet Explorer.

5. Antivirus program blocking setup files:
Solution: Disable if any the antivirus program install in your computer temporary and try to install the application.  

6. Corruption of the registry:
Solution: Use Some trusted third party tool (CCleaner) to clean the registry and try to

Thursday, December 06, 2012

Unit test for unmanaged C++ in Visual Studio


Bugs free software is a dream of every person who involve in software development process. But with the today complex software systems and even more featured requirements , it is quite a challenge to overcome this specific expectation.
There are number of methodologies and tools for bug tracking, debugging, error tracing and various level to testing. But as the developers unit testing and integrated testing are the most important kind of testing that require to implement a bug free software. So in this article I'm  going to show you some tips and methodologies of unit testing.   As C++ developers knows unit testing for unmanaged C++ is a quit cumbersome and there is no standers way to do the unit testing for development environment. Normally expert developers prefers the TDD (Test driven development) for error less software and as a confident development method  that support to maintain and extend the already developed software.

Most of the Unmanaged C++ developers  developers mostly use some kind of third party Unit Test frame-works such as 'Boost Test', 'Google Test' or 'cppUnit'  even they works on windows environment. Actually these unit testing frameworks have some unique features and capabilities than .NET unit testing framework, such as object mocking and various Assert rules. But when you are working with Visual Studio IDE, using .NET unit testing framework may easy to use and compatible than other unit testing frameworks. But even some developers uses .NET unit testing capability for MFC or ATL projects (Manage C++), Most of them  don't have idea how to use it with unmanaged C++ development. But If  you are involving in DLL or LIB development using C++ it is easy to do unit testing by adding the static or dynamic library as reference to the testing project.

But in this article I'm going to introduce you how the set-up unit testing for  for Win32 console application  (Unmanaged C++) (But even this is possible with Win32 windows applications) in Visual Studio 2010 with Windows operation system. Even I describing this for Visual Studio 2010, It may applicable with other versions such as 2012,2008 or 2005. So lets start as step by step guide from here.

Today I'm going to develop a simple calculator with unit testing for the functionality.

Add Main Project

1. Open visual studio 2010 and Create a new project by using 'File' -> 'New'
2. In new project window go to right hand side panel -> select Visual C++ -> select Win32
3. In the Right hand side panel select 'Win32 Console Application'
4. Type 'calculator' in Name text field bellow and select the location as you need.


5. Then next window (Win32 Application Wizard) just click next
6. Then next window select 'Empty Project' and keep setting as this image. then click finish


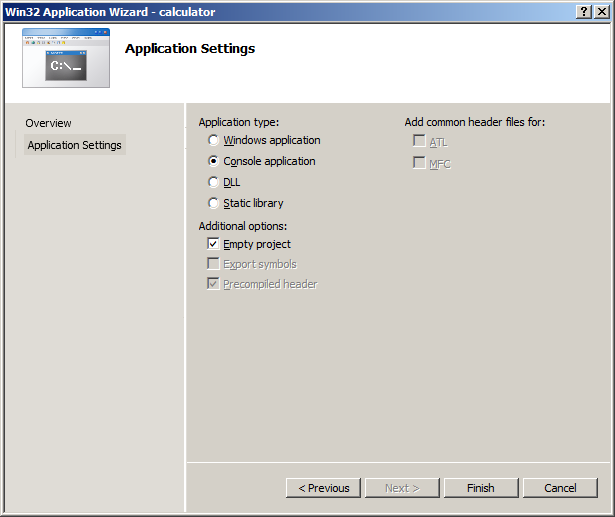
So this is our main project and main method should be in this project for initiate the application.

7. In the Solution explorer expand calculator -> right click on 'Source File' -> 'Add' -> 'New Item' -> select 'C++ File (.cpp)'
8. Type the name 'main' in Name text box and click add


Add Lib Project

1. Right click Solution in 'Solution explorer' and select 'Add' -> 'New Project'
2. Next window in left pane select Win32 and in right pane select 'Win 32 Console Application'
3. Type 'calculator_lib' in Name text box and click ok.
4. In next window just click next
5. In next window select Static library and keep other setting as image. Then click finish.


Add Test Project

1. Same as above right click Solution in 'Solution explorer' and select 'Add' -> 'New Project'
2. Next window left hand panel select 'Visual C++'->'Test'
3. Type calculator_test in Name text box
4. Click OK

Now your solution explorer should have three project and It should looks like this image


Configurations Test Project 

1. Right click calculator_test project and select properties'
2. In left hand panel select 'Common Properties' -> 'Framework and Referance'
3. In right side panel click 'Add New Reference' button at bottom
4. Select 'Project' tab then select  'calculator_lib' and  click OK
5. Left side panel select 'Configuration Properties' then 'General'
6. In top left combo box select 'All Configurations
7. Change the Target Name from 'DefaultTest' to 'CalculatorTest'
8. Then expand 'C/C++' and select 'Genaral' in left hand panel
9. In right hand panel there is a entry 'Additional Include Directories' paste the bellow text there

$(SolutionDir)\calculator_lib;%(AdditionalIncludeDirectories)

10. change 'Common Language Run Time Support' as 'Common Language RunTime Support (/clr)' in Right side panel and click OK

Configurations Main Project 

1. Right click on calculator project and select properties.
2. In top left combo box select 'All Configurations
3. In left hand panel select 'Common Properties' -> 'Framework and Referance'
4. In right side panel click 'Add New Reference' button at bottom
5. Select 'Project' tab then select  'calculator_lib' and  click OK
6. Then expand 'C/C++' and select 'Genaral' in left hand panel
7. In right hand panel there is a entry 'Additional Include Directories' paste the bellow text there

$(SolutionDir)\calculator_lib;%(AdditionalIncludeDirectories)

8. Click OK


C++ Coding

1. Go to solution explorer and expand the calculator project
2. open the 'main.cpp' file and paste the following code on it.

#include <iostream>
using namespace std;
int main()
{
 cout << "This is my first Unit Test for unmanaged C++ application";
 return 0;
}
3. Click Ctl+F7 to build the solution and solution should build with three projects as bellow image.


4. Right click the 'calculator_lib' project in solution explorer and click 'Add'-> 'Class'
5. Select 'C++ Class' from right panel in next window and click add.
6. In next window add 'basic_calculator' in 'Class name' text box and click finish.


7. Open' basic_calculator.h' file and replace the following code in to it
#pragma once
class basic_calculator
{
public:
 basic_calculator(void);
 ~basic_calculator(void);
 int add(int a,int b);
 int minus(int a,int b);
 int multiply(int a,int b);
 int devid(int a,int b);
};

8. Open 'basic_calculator.cpp' file and replace the fallowing code in to it


#include "StdAfx.h"
#include "basic_calculator.h"
basic_calculator::basic_calculator(void)
{
}
basic_calculator::~basic_calculator(void)
{
}
int basic_calculator::add(int a,int b)
{
 return a+b;
}
int basic_calculator::minus(int a,int b)
{
 return a-b;
}
int basic_calculator::multiply(int a,int b)
{
 return a*b;
}
int basic_calculator::devid(int a,int b)
{
 return a/b;
}

Adding test case
1. Right click the calculator_test project and click 'Add' then 'New Test'
2. In next window select 'UnitTest' and add 'basic_calculator_test' for 'Test Name' text field and click OK


3. Open basic_calculator_test.cpp file and clear unawareness comment, include 'basic_calculator.h' file and create a pointer 'by basic_calculator' class

Note: Actually here I'm showing how to write vary basic few test cases for your start. Later you can find your own journey in unmanaged C++ unit testing.


4. Change test method name to addTest and write a test case for 'add' functionality using assert
5. Same as this add another three test cases for remaining functionality also.
6. So finally your  'basic_calculator_test' should be like this

Note: Mostly IntelliSense not supporting for C++ Test project in Visual Studio 2010

#include "stdafx.h"
#include "basic_calculator.h"

using namespace System;
using namespace System::Text;
using namespace System::Collections::Generic;
using namespace Microsoft::VisualStudio::TestTools::UnitTesting;


namespace calculator_test
{

[TestClass]
public ref class basic_calculator_test
{
private:
TestContext^ testContextInstance;
basic_calculator* test_calculator;

public:
property Microsoft::VisualStudio::TestTools::UnitTesting::TestContext^ TestContext
{
 Microsoft::VisualStudio::TestTools::UnitTesting::TestContext^ get()
 {
  return testContextInstance;
 }
 System::Void set(Microsoft::VisualStudio::TestTools::UnitTesting::TestContext^ value)
 {
  testContextInstance = value;
 }
};

[TestMethod]
void addTest(){Assert::AreEqual<int>(6, test_calculator->add(4,2));};

[TestMethod]
void minusTest(){Assert::AreEqual<int>(2, test_calculator->minus(4,2));};

[TestMethod]
void multiplyTest(){Assert::AreEqual<int>(8, test_calculator->multiply(4,2));};

[TestMethod]
void devidTest(){Assert::AreEqual<int>(2, test_calculator->devid(4,2));};

[TestMethod]
void addTestForFail(){Assert::AreEqual<int>(5, test_calculator->add(3,3));};
};
}

7. Now you finish creating test cases for your basic_calculator.
8. Right click on "Soloution 'calculator'" in project explorer and click properties
9. Next window select calculator_test as 'Single startup project' and click ok


10. Then press Ctl+F7 to build the project and then F5 to run.
11. You will see your Unit test are running in the bottom and you can see the result in 'Test Result' Window

12. So as we expected four of our unit test passed and one failed you can write more advance test cases by improving your knowledge and  reading about Assert functions.

Building Application
1. Open main file under 'calculator' project and replace with fallowing code.


#include <iostream>
#include "basic_calculator.h"

using namespace std;

int main()
{
cout << "This is my first Unit Test for unmanaged C++ application" << endl;

basic_calculator* my_calculator = new basic_calculator();
cout << "4 + 2 =" << my_calculator->add(4,2) << endl;
cout << "4 - 2 =" << my_calculator->minus(4,2) << endl;
cout << "4 * 2 =" << my_calculator->multiply(4,2) << endl;
cout << "4 / 2 =" << my_calculator->devid(4,2) << endl;

system("pause");
return 0;

}

2.Right click on "Soloution 'calculator'" in project explorer and click properties again
3. Next window select 'calculator' as 'Single startup project' and click ok
4. Build the project and run then you can see the result


Congratulations!  Now you know how to create unit test for unmanaged C++ applications. So need to do more studies to be a expert Unit test writer. I'm putting her some resource for your referance

http://msdn.microsoft.com/en-us/library/microsoft.visualstudio.testtools.unittesting.assert.aspx
http://msdn.microsoft.com/en-us/library/te3ecsc8.aspx

Sunday, November 18, 2012

Tab key not working in Visual Studio 2010

If you face the not working tab key in the visual studio editor. Here shows how to make Tab key work.
  1. Go to Tools->Options->Text Editor->C/C++->Formatting
  2. Find the "Indentation" group on right side.
  3. Find the Automatic Indentation On Tab.
  4. Make it false.
  5. Enjoy the Tab key :)

If you are working with some other language, Then select the appropriate language instead of C/C++

Thursday, September 13, 2012

How to solve openscmanager failed error 5


Situation

Some times when you working with command prompt, script running, or program installing with winnows environment  it may fire fallowing one of error.

Error

  1. openscmanager failed <error 5>
  2. OpenSCManager failed - Access is denied. (0x5)
  3. [SC] OpenSCManager FAILED 5:
  4. "OpenSCManager()" failed with error code "5"

Solution

  1. Program (script. command prompt, software)  right click and run as administrator.
  2. If not success, Log-off and login as the administrator and try again

Thursday, July 05, 2012

How to 'Run As' multiple programs using a script in windows

As a system engineer or as a developer sometimes you may need to run multiple programs at once as a sequence or, one by one after some intervals. Following is a VB script created for specific purpose.

  • weAdmin\imAdmin - Specific use for "Run As"
  • C:\Test\Test1\Test1.exe - Path and file name
  • admin1234 - Password for the specific user.
  • 100 - Some waiting time to initialize 'run as'
  • 1000 - waiting time until next program run. (Configure this as you want)
Option explicit
Dim oShell
set oShell= Wscript.CreateObject("WScript.Shell")

oShell.Run "RunAs /noprofile /user:weAdmin\imAdmin ""C:\Test\Test1\Test1.exe"""
WScript.Sleep 100
oShell.Sendkeys "admin1234" 
oShell.SendKeys "{ENTER}"
WScript.Sleep 1000

oShell.Run "RunAs /noprofile /user:weAdmin\imAdmin ""C:\Test\Test2\Test2.exe"""
WScript.Sleep 100
oShell.Sendkeys "admin1234"
oShell.SendKeys "{ENTER}"
WScript.Sleep 1000

oShell.Run "RunAs /noprofile /user:weAdmin\imAdmin ""C:\Test\Test3\Test3.exe"""
WScript.Sleep 100
oShell.Sendkeys "admin1234"
oShell.SendKeys "{ENTER}"
WScript.Sleep 1000

oShell.Run "RunAs /noprofile /user:weAdmin\imAdmin ""C:\Test\Test4\Test4.exe"""
WScript.Sleep 100
oShell.Sendkeys "admin1234"
oShell.SendKeys "{ENTER}"
WScript.Sleep 1000

Wscript.Quit

"The application has failed to start because the side by side configuration is incorrect please see the application event log or use the command line sxstrace.exe tool for more detail"

After finished the developmental of the application you may move the binaries to the separate windows 2008 serve and try to run. So at the time you may face to a error message box that show the above error message or some error near to that. If that now be ready to correct it.


Error Message

SETP : 01

1. Click on the Start button
2. Go to control panel
3. Change "View by"(located at right side top op the control panel) to "Large icons"
4. Click on Program and Features.


STEP 02:

01. On the "Program and Features" window  click on the "Turn windows features on or off"


02. Then click on the "Features"

03. Check weather ".NET Frameworks 3.5.1 Features" checked  or not if not check it


04.  Click "Next" and click on the "Add required Role Services"


05. Click Install


06. Click next and next and next and wait wait until installation finished


07. Click next and close


08. Then close everything
09. Right click the "My Computer" > Go the "Manage" > Go to "Event Viewer".
10. Then go to "Windows Logs" > Go to "Applications"


So you will see this side of side to side errors. If not please try to run your application or program again and then check.


11. Right click on the error and go to "Event Properties"


12. You read the error message and check the "Processor architecture". In this case it is "X86" means 32 bit.

13. The Check the VC++ version you use to code the application. it may be VS 2005, 2008 or 2010.

14. So then combine your server computer architecture and developed computer VC++ version and download the C++ re-distributable package. Then install it in the server.

As examples

Processor Architecture
VC++ version
C++ Redistributable Pacakge
X86
VC++ 2005
Microsoft Visual C++ 2005 SP1 Redistributable Package (x86) 
X86
VC++ 2008
Microsoft Visual C++ 2008 SP1 Redistributable Package (x86) 
X64
VC++ 2010
Microsoft Visual C++ 2010  Redistributable Package (x64) 
X64
VC++ 2005
Microsoft Visual C++ 2008 SP1 Redistributable Package (x64) 

15. Restart the server and run your program again

16. If not success you have to Diagnosing SideBySide failures using sxstrace.exe. For more details about this
go to this link.
http://blogs.msdn.com/b/junfeng/archive/2006/04/14/576314.aspx


Friday, June 15, 2012

How to read PDF file in black background and green or white text

Most of the windows users use Adobe reader to read PDF files. But if you read a PDF file long time. your eyes may blur and pain because of the white colour background and the because of the high contrast and brightness. To get rid of this you can use Adobe Reader colour replace facilities to change the colour of the PDF File.

How: 

1. Go to Edit 

2. Go to Preferences.., Then Accessibility 


3. Change the Page Background and Document Text Colors


4. Press OK, close PDF and open again. Then It looks like this.


5. This may help to keep your eye cool when you are reading :)

Thursday, June 14, 2012

How to kill process running in a remote computer using command prompt

Windows servers maintaining is not a simple task and most of the time need to log in to servers and kill some running process and some time need to start the processes or applications. So this is a method to kill a process running on a remote computer using dos command in windows environment. You can use this method to kill a process in you local PC too. You can directly run this command in command prompt or also can run as saved bat file.


TASKKILL /S system /U username /P password /FI filter /PID processid or /IM imagename /F /T


Parameter List:
-----------------------------------------------------------------------------------------------------------
/S system Specifies the remote system to connect to.

/U [domain\]user Specifies the user context under which
the command should execute.

/P [password] Specifies the password for the given
user context. Prompts for input if omitted.

/F Specifies to forcefully terminate
process(es).

/FI filter Displays a set of tasks that match a
given criteria specified by the filter.

/PID process id Specifies the PID of the process that
has to be terminated.

/IM image name Specifies the image name of the process
that has to be terminated. Wildcard '*'
can be used to specify all image names.

/T Tree kill: terminates the specified process
and any child processes which were started by it.

/? Displays this help/usage.


Filters:
-----------------------------------------------------------------------------------------------------------
STATUS eq, ne RUNNING | NOT RESPONDING
IMAGENAME eq, ne Image name
PID eq, ne, gt, lt, ge, le PID value
SESSION eq, ne, gt, lt, ge, le Session number.
CPUTIME eq, ne, gt, lt, ge, le CPU time in the format
of hh:mm:ss.
hh - hours,
mm - minutes, ss - seconds
MEMUSAGE eq, ne, gt, lt, ge, le Memory usage in KB
USERNAME eq, ne User name in [domain\]user
format
MODULES eq, ne DLL name
SERVICES eq, ne Service name
WINDOWTITLE eq, ne Window title

NOTE: Wildcard '*' for the /IM switch is accepted only with filters.

NOTE: Termination of remote processes will always be done forcefully
irrespective of whether /F option is specified or not.

Examples:
-----------------------------------------------------------------------------------------------------------
TASKKILL /S system /F /IM notepad.exe /T
TASKKILL /PID 1230 /PID 1241 /PID 1253 /T
TASKKILL /F /IM notepad.exe /IM mspaint.exe
TASKKILL /F /FI "PID ge 1000" /FI "WINDOWTITLE ne untitle*"
TASKKILL /F /FI "USERNAME eq NT AUTHORITY\SYSTEM" /IM notepad.exe
TASKKILL /S system /U domain\username /FI "USERNAME ne NT*" /IM *
TASKKILL /S system /U username /P password /FI "IMAGENAME eq note*"


Monday, June 04, 2012

How to send a email using VB Script.

Some times requirements occurs to send email from Windows environment. it may be due to server monitoring or application monitoring purpose or may be some other need. Lot of third-party applications in the internet and you can try those your own. But most light weight and slandered way to send email from windows environment is the VB script. Using VB Script is very easy and simple. following is the way to send a email using VB Script. this can be help to your script development and system monitoring purpose.


Dim objMail

Set objMail = CreateObject("CDO.Message")

'sender email address
objMail.From = "Sender <sender@abcmail.com>"

'Receiver email address
objMail.To = "Receiver <receiver@abcmail.com>"

'Email subject
objMail.Subject = "This is the testing email subject"

'Email Body
objMail.Textbody = "This is the my first email send by vb script"

'If you need to attache a file,can do in this way.
objMail.AddAttachment "C:\myphoto.jpg"

'Configure SMTP server
objMail.Configuration.Fields.Item _
    ("http://schemas.microsoft.com/cdo/configuration/sendusing") = 2

'Here you should configure name or IP of the SMTP server
objMail.Configuration.Fields.Item _
    ("http://schemas.microsoft.com/cdo/configuration/smtpserver") = _
    "192.168.1.23"

' SMTP port need to configure here (Default 25)
objMail.Configuration.Fields.Item _
    ("http://schemas.microsoft.com/cdo/configuration/smtpserverport") = 25

'update the field in message object 
objMail.Configuration.Fields.Update

'sending email
objMail.Send

'clear mail object
Set objMail=Nothing

'exit the script
Wscript.Quit
Some times we need to check if a process is running in a remote server. For this purpose it can be log in using remote desktop or ant other third-party tool like team-viewer. but here problem is need to wast some time on this method. How if you can check the process status of the remote server from your PC? This is the way to achieve that.

windows provide a command "tasklist" to achieve this requirement. So fallowing is the technical description about this.

tasklist /s IPAddress /u username /p password /fi "USERNAME eq processUsername" 


  • IPAddress - IP Address of the remote computer
  • username - User name of the remote computer
  • password - password of the remote computer
  • processUsername - The process you need to monitor should under this user name (you can get user name from Task Manager of the remote computer) . If you no need to filter process by username, you can ignore  "/fi "USERNAME eq processUsername" part from the command


Full bat file

@echo off
echo processing, please wait...
tasklist /s IPAddress /u username /p password /fi "USERNAME eq processUsername"
echo
echo ----------------------------------------------------------------------------
pause


For more information you can go to this page http://technet.microsoft.com/en-us/library/bb491010.aspx