As you know in the computer hardware world reading and writing to the storage disk is the bottleneck for the data transfer. Even though processors an memory chips getting faster and faster, Hard disk reading and writing technologies did not meet the requirement that industry expected. But, recently after SSD (Solid State Drive) reached to the market, Users got quite comfort because of the data read and write speed if they ignore the risk of lost data.
You may need more and more speed to read and write data to the storage because of these kind of applications.
1. Backup all the data in your computer and you might need to reinstall the OS.
After setting the RAID all of the data in SSD will lost. So if you need the data in SSDs please backup all of those. By right other drivers should not affect by setting RAID on newly added SSDs. But in my case my Windows 10 OS corrupted after setting RAID. So be prepare or trust the God. I suggest you to back up all the things in the Desktop, bookmarks etc..
2. Prepare the necessary hardware.


3. Connect the SSD to motherboard.
Connect the two SSDs to the motherboard using two SATA cable and power splitter. If you have more than two SSDs, Those must be same capacity and connect all SSDs to the motherboard. Usually SATA cable in motherboard named like STA1, SATA2, STA3 etc.. But if you can see some other names, You should give priority to port named with SATA1,SATA2 etc... I have tried other ports. even though the cable can be plug, SSDs ware not recognize by the motherboard. Make sure to provide power to the SSDs.
4. Turn on RAID from BIOS.
Turn on the computer and go in to BIOS setting by pressing the necessary key. Find how to turn on the RAID feature. Different BIOS interfaces giving different way to turn on the RAID feature. In my case I'm using Dell Tower workstation. So Here is how I turn on the RAID feature using BIOS interface.

5. Create RAID 0 using RAID Interface
5.1.
After RAID feature on, Save and exit from the BIOS the your computer will restart and it will show up a new interface line this.

5.2.
It is asking to go press CTRL+I keys to go to RAID setup interface. So please press control and I keys together. Then it will forward you to a this kind of interface.

5.3.
This is RAID setup interface. Use the arrow keys in the keyboard and select Create RAID Volume and press Enter. This you will see this screen.

5.4.
This is the RAID Volume setting interface. Type a suitable name (I typed Voloume0), Select RAID0 as RAID Level, Keep other things as default. In my case above screen shows the settings I have choose. Use arrow key and go to Create Volume, then press Enter. Then you can see this screen.

5.5.
This interface allow you to select what the the SSDs you choose to include in to the new RAID0 drive named "Voloum0" In my case I have selected my newly added two 1TB Samsung SSDs. I have one more 256GB space SSD, that uses to install the operating system. And also a hard drive I uses to store data before buying SSDs. You can use space bar to select the SSDs and press Enter after selecting.

5.6.
Then it will ask your confirmation. Press Enter to Confirm and then exit from the RAID setting interface by confirming below dialog..
6. Restart the computer and enjoy lightning faster data read and write.
After exit, it will restart the computer automatically, Even though it shows the RAID setup enter interface we saw in 5.1 don't do anything this time. If you are lucky, your computer will boot without issue. otherwise you have to reinstall the operating system. In my case I had to install Operating system again.
After boot the computer, Right click on the My computer (ThisPC in Windows 10) > Go to "Manage" > Go to "Disk Management" Then you can see the new drive as a new one disk. Im my case I have 1769.77 GB one disk. You can this this is just a hard drive and create partition as you like from this space.
In my case I will create two partitions as shown in below image.

You may need more and more speed to read and write data to the storage because of these kind of applications.
- Compile large source code base
- Video editing & rendering
- Working with large CAD files or plans
- Search in large set of data (Big Data)
- Search in large databases (Geographical Map Data)
- Playing Computer Games
1. Backup all the data in your computer and you might need to reinstall the OS.
After setting the RAID all of the data in SSD will lost. So if you need the data in SSDs please backup all of those. By right other drivers should not affect by setting RAID on newly added SSDs. But in my case my Windows 10 OS corrupted after setting RAID. So be prepare or trust the God. I suggest you to back up all the things in the Desktop, bookmarks etc..
2. Prepare the necessary hardware.
- Your motherboard should support to configure RAID (Check motherboard details or BIOS setting) and should have two free SATA slots.

- Two (or more) SSDs with same capacity (In my case I have two 1TB SSDs)

- Two SATA cables to connect SSD to mother board

- SATA power cable splitters(T cable) in case if your casing doesn't have extra two power slots. (In my case, casing has one extra power slot, So I bought one splitter)

3. Connect the SSD to motherboard.
Connect the two SSDs to the motherboard using two SATA cable and power splitter. If you have more than two SSDs, Those must be same capacity and connect all SSDs to the motherboard. Usually SATA cable in motherboard named like STA1, SATA2, STA3 etc.. But if you can see some other names, You should give priority to port named with SATA1,SATA2 etc... I have tried other ports. even though the cable can be plug, SSDs ware not recognize by the motherboard. Make sure to provide power to the SSDs.
4. Turn on RAID from BIOS.
Turn on the computer and go in to BIOS setting by pressing the necessary key. Find how to turn on the RAID feature. Different BIOS interfaces giving different way to turn on the RAID feature. In my case I'm using Dell Tower workstation. So Here is how I turn on the RAID feature using BIOS interface.

5. Create RAID 0 using RAID Interface
5.1.
After RAID feature on, Save and exit from the BIOS the your computer will restart and it will show up a new interface line this.

5.2.
It is asking to go press CTRL+I keys to go to RAID setup interface. So please press control and I keys together. Then it will forward you to a this kind of interface.

5.3.
This is RAID setup interface. Use the arrow keys in the keyboard and select Create RAID Volume and press Enter. This you will see this screen.

5.4.
This is the RAID Volume setting interface. Type a suitable name (I typed Voloume0), Select RAID0 as RAID Level, Keep other things as default. In my case above screen shows the settings I have choose. Use arrow key and go to Create Volume, then press Enter. Then you can see this screen.

5.5.
This interface allow you to select what the the SSDs you choose to include in to the new RAID0 drive named "Voloum0" In my case I have selected my newly added two 1TB Samsung SSDs. I have one more 256GB space SSD, that uses to install the operating system. And also a hard drive I uses to store data before buying SSDs. You can use space bar to select the SSDs and press Enter after selecting.

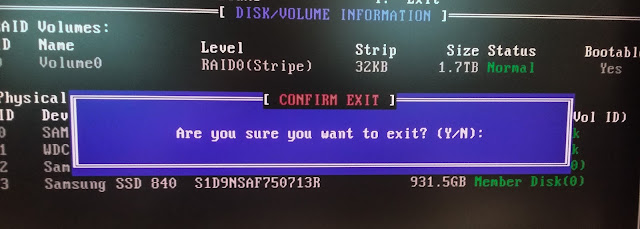
5.6.
Then it will ask your confirmation. Press Enter to Confirm and then exit from the RAID setting interface by confirming below dialog..

6. Restart the computer and enjoy lightning faster data read and write.
After exit, it will restart the computer automatically, Even though it shows the RAID setup enter interface we saw in 5.1 don't do anything this time. If you are lucky, your computer will boot without issue. otherwise you have to reinstall the operating system. In my case I had to install Operating system again.
After boot the computer, Right click on the My computer (ThisPC in Windows 10) > Go to "Manage" > Go to "Disk Management" Then you can see the new drive as a new one disk. Im my case I have 1769.77 GB one disk. You can this this is just a hard drive and create partition as you like from this space.
In my case I will create two partitions as shown in below image.